
Key Takeaways
- Put personal safety ahead of inspections, cleanup, and repairs.
- Document visible exterior and interior damage before conditions change.
- Take reasonable temporary steps to limit further water damage.
- Keep photos, receipts, estimates, reports, and claim communications together.
- Compare qualified contractors carefully and avoid high-pressure agreements.
Roof damage can be stressful because the most important problems are not always obvious from the driveway. A few missing shingles, loose flashing, or a puncture from a branch can allow water into the roof system, attic, walls, or ceiling finishes. The best response is methodical: protect people first, record what happened, limit additional damage, and then make informed repair decisions. Insurance questions are often part of that process, but coverage depends on the policy, the cause of loss, exclusions, deductible, roof condition, and other terms. Before assuming a repair will be covered, homeowners can learn whether home insurance covers roof damage and review their own policy documents or speak with their insurer.
Why Roof Damage Requires A Careful Plan
Water does not always enter and appear in the same place. It can follow roof decking, rafters, wiring paths, or wall framing before leaving a stain on a ceiling. Acting quickly matters, but rushing onto a wet, steep, or damaged roof can turn a property problem into a serious injury. A careful sequence helps preserve evidence while keeping the home safer.
Step 1: Check For Immediate Safety Risks
Do not enter areas with sagging ceilings, exposed wiring, broken glass, standing water near electrical equipment, or visibly unstable structural sections. Leave immediately if there is a gas odor, sparking, smoke, or a downed power line. Contact emergency services or the appropriate utility when a serious hazard is present. The National Weather Service advises people to avoid downed power lines and to use caution around storm-damaged structures during post-storm safety checks.
Step 2: Inspect From The Ground First
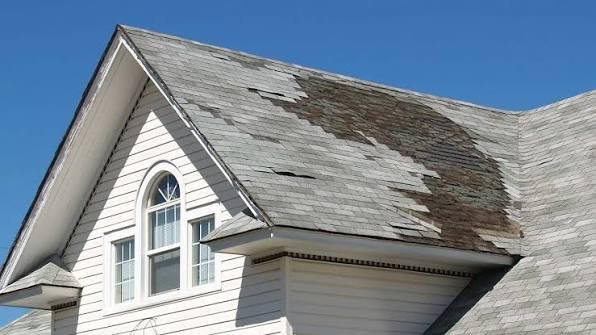
Walk around the property only when it is safe to do so. Do not climb a ladder or step onto the roof to investigate damage. Use a phone camera with zoom to capture details from the ground.
- Missing, cracked, curled, lifted, or displaced shingles.
- Shingle pieces, flashing, or other roof material in the yard.
- Loose material near chimneys, vents, skylights, or roof edges.
- Dented gutters, downspouts, siding, screens, or outdoor equipment.
- Fallen limbs or trees resting on, or close to, the house.
Step 3: Look For Signs Inside The Home
Check rooms beneath the roof and, if safely accessible, the attic. Look for brown or yellow stains, peeling paint, bubbling drywall, drips, soft ceiling areas, wet insulation, damp framing, or a musty smell. Do not touch damaged electrical fixtures or walk beneath a ceiling that appears to be bulging from trapped water.
Step 4: Build A Clear Damage Record
Start with wide photos that show the full roofline, room, or affected exterior area, then take close-ups of specific damage. Record the date, approximate time, weather event, and when you first noticed each issue. Photograph damage to ceilings, walls, flooring, gutters, siding, windows, insulation, and belongings before cleanup whenever possible. Create one digital folder for photographs, videos, inspection reports, estimates, invoices, receipts, emails, and notes from phone calls. A simple written log should identify who you spoke with, the date, and what was discussed. This record can make it easier to compare estimates and explain the sequence of events.
Step 5: Reduce Additional Damage Without Creating New Problems
Temporary protection is not the same as permanent repair. Place containers under active drips, move furniture and electronics away from water, and protect belongings that can be safely relocated. If roof access is unsafe, ask a qualified professional about emergency tarping or other appropriate measures. Keep receipts for reasonable emergency work and materials, but avoid major repairs until the damage is documented and evaluated.
Step 6: Review The Home Insurance Policy
Find the declarations page, deductible information, exclusions, endorsements, and claim instructions. In general, policies may treat sudden storm damage differently from deterioration, deferred maintenance, or long-term wear. Replacement cost coverage and actual cash value coverage can also produce different payment calculations, so homeowners should not assume either applies without reviewing their specific policy. Ask the insurer clear questions about the reported cause of damage, temporary repairs, water intrusion, roof age, documentation requirements, and deadlines. The Consumer Financial Protection Bureau recommends keeping important records and contacting relevant companies promptly after a disaster to help protect finances and property.
Step 7: Decide Whether A Professional Inspection Is Needed
A roof may appear intact from the ground while still having damage that requires closer evaluation. If damage is suspected, consider a properly qualified roofing professional who can provide a written inspection report.
Questions To Ask A Roofing Contractor
- Are you licensed or registered where required?
- Do you carry liability and workers’ compensation coverage?
- Will you provide a written scope of work and inspection findings?
- Does the estimate list materials, labor, flashing, ventilation, cleanup, and disposal?
- Will permits or code-related work be required?
Step 8: Compare Repair And Replacement Options
A focused repair may make sense when damage is limited and surrounding roof materials remain in serviceable condition. Broader work may be worth discussing when damage is widespread, leaks recur, or multiple roof components fail. Compare written estimates on scope and materials, not just price. Confirm warranties, payment timing, expected start date, ventilation work, cleanup responsibilities, and permit requirements.
Common Contractor Red Flags
- Unsolicited storm-chasing visits paired with pressure to sign immediately.
- Large upfront payment requests before materials or work are scheduled.
- Vague estimates that omit materials, labor, or cleanup details.
- Promises that the homeowner will pay nothing without reviewing the policy.
- Requests to sign blank forms or surrender broad control of an insurance claim.
- Advice to avoid the insurer, local building office, or mortgage servicer.
A Simple 24-Hour Action Checklist
- Check for immediate hazards and stay off the roof.
- Photograph exterior and interior damage from safe locations.
- Move belongings away from leaks and collect dripping water.
- Arrange safe temporary protection if needed.
- Review the policy, deductible, and claim instructions.
- Contact the insurer and schedule a qualified inspection.
- Save every receipt, report, estimate, and message.
Conclusion
Roof damage is easier to manage when homeowners avoid rushed decisions and first focus on safety and documentation. Make the property safe, document the original condition with photographs and notes, and take reasonable temporary steps to prevent additional loss where it is safe and appropriate to do so. Homeowners should keep records of visible damage, affected rooms or belongings, temporary repairs, receipts, inspection findings, and communications with contractors or insurers. Before committing to permanent repairs, obtain clear written information about the proposed work, materials, estimated costs, timelines, warranties, and any other important terms. It can also be helpful to obtain a qualified inspection when the cause or extent of the damage is unclear, particularly when problems may involve the roof structure, flashing, drainage, or underlying materials. A careful record and professional assessment provide a stronger foundation for comparing repair options, discussing the situation with the insurer, and deciding what should happen next.